It’s very exciting in my house right now as we have got to the point where everything starts to come together actually in the clock itself. For this stage of the project I’m working with a brilliant mentor Billy Payne, who is an experienced instrument builder, and my husband Euan, who is an electrical engineer and doing most of the actual building because my hypermobile wrists do not enjoy manual labour.
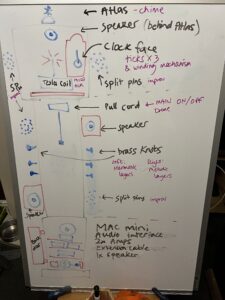 I’ve been working on a few things over the last couple of days that I want to show you; firstly this sketch of how everything is going to sit inside the clock. We’re adding a bunch of things to the outside of the clock body, all of which will be wired up to the computer and will make a sound when you touch them. Some will trigger the pre-recorded loops that I’ve made already, and some will just be a single sound so that you can improvise different melodies of your own.
So from the top down: a brass figure of Atlas holding the world on his shoulders is going to sit on top of the clock – sounds a bit random but bear with me! All the clock sounds you hear in the piece have been recorded from an antique Dutch wall clock I have at home (click this link to see a similar one), so to reference it visually to my new ticking clock I have taken some of the decorations off another one I have which is the same style but doesn’t work. (I mean, who doesn’t have at least a couple of antique Dutch clocks lying around at home, right?!) This type of clock famously has a figure of Atlas on the top so I thought it would be a nice way of tying in the sounds with the visuals – I’m also using the hands from the old clock and the pendulum weights. There’s going to be a speaker inside the top section of the clock, plus inside will be a little toy Tesla coil that will spark in time with the tick. On the front of the top section we will have clock hands, which will be wired up so that when you turn the hands of the clock it triggers new sounds.
In the middle section of the clock there’s going to be a pull cord that will turn the whole thing on and off. We’ve fixed some brass knobs to the outside of the middle section which will be touch sensors, and I spent a ridiculously long time 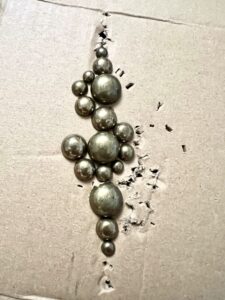 designing this pattern of split pins which will also be wired up as touch sensors and allow you to improvise little melodies by touching the different pins. Euan is currently drilling holes in the side of the clock as I sit here writing this, pretending not to wince every time he drill something in case it’s a millimetre out of line. I’ve spent HOURS working out this pattern and building a template for putting the holes in the clock, and we have at least three versions of it on cardboard and four in random scraps of wood. It’s a bit ridiculous really but hopefully it should look awesome!
That’s it for the middle, apart from a speaker on each side. I’m going to try and set it up so the sound moves around the different speakers; I want the effect of it twisting around the outsides of the clock but I’m not going to know if it’s fully worked until we’ve got everything in place.
The bottom section is mostly where the hardware is going to be – a little computer, a couple of audio interfaces, and a lot of wiring. There will be a speaker down there too, and Euan has cut out the back of the clock to make a door so we can get things in and out.
That’s pretty much it for now; Billy has taken my computer away and wired up some touch sensors to test out the audio side of things, and the next step is putting it all into the clock and hoping it works as I want it to. With any luck we’ll be able to get it together in the next couple of days, which should give us enough time for troubleshooting before it goes into the Potteries Museum next Thursday. Eek!